


Welcome to the fascinating world of 3D Printing with ELEGOO! This comprehensive guide will dive into the ins and outs of FDM 3D printing and demystify everything you need to know about unboxing, assembling, and how to get started.
In the tutorial video of Neptune 4 and Neptune 4 Pro, you will learn how to assemble ELEGOO’s FDM 3D printer using the provided tool kit.
Step 1: Unbox and Assemble to Kick Start
-
When installing the print head to the top, pay attention to the installation direction and straighten the cable while installing it. Then use the cable clamp to secure it in place. Check the voltage on the red slide at the back of the machine and make sure the voltage is set to match your local voltage.
-
Slide the print head left and right to ensure it can move smoothly. Finally, ensure that the x-axis and y-axis belts are tightened to ensure that your prints are in the correct position.

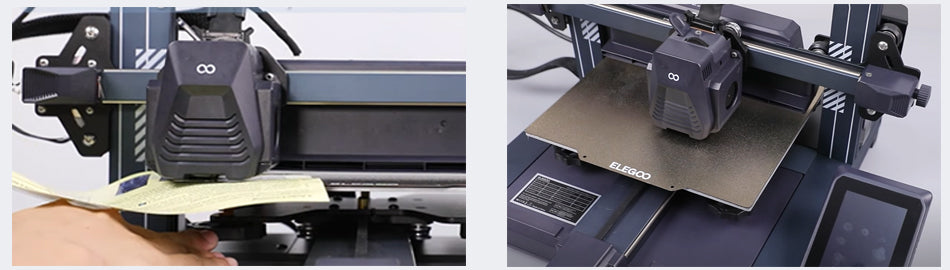
Step 2: Leveling the Machine Before Printing
-
Once the machine is assembled, proceed to turn it on, and you will need to level the bed before printing.
-
Click the leveling and then compensation button on screen. Once the print head is at the center point, place an A4 paper on the platform. The distance between the platform and the nozzle needs to be calibrated in the leveling mode, which is about the thickness of a piece of A4 paper. During the leveling, you will need to push and pull the paper until the paper can be pulled out but not pushed in.
-
Afterwards, follow the auto-leveling calibration and apply grease afterwards to ease the print head's movement. You’re all set to kick start your first print now!
Step 3: Install Filament and Start Printing!
-
It’s almost there! When installing the filament, remember to install the filament sensor. Additionally, make sure to straighten one end to ensure smooth passage of the filament. Now, you’re all set and ready to start printing!
-
You can either use the existing files in the USB provided to test-print or visit 3D printing open-source platforms that will help on your journey: My Mini Factory, All3DP, Cults3D, and Thingiverse.

Check out the below ELEGOO’s collaboration work with other content creators!
Lastly, if you encounter any problems while using or would like to further understand the setting, you can refer to the useful how-to guide below:
With these tips and a little practice, you'll be creating amazing 3D prints in no time. Enjoy the 3D printing with ELEGOO!


