


If your printer needs to replace the lens of the UV lamp, please follow the steps below.
Tools you need: 2.0mm Hex Wrench, 2.5mm Hex Wrench, Phillips Screwdriver, Marker Pen, New Lens
STEPS:
1) Unlock the screws with the Hex Wrench and take off the back and front shell of the printer.
Pay attention to the cable of the touch screen when removing the front shell.
2) Loosen the cable lock and gently unplug the cable that connects the motherboars and the touch screen for the convenience of later operations.
3) Mark the cable ports with "1, 2, 3" as the picture showing in case of misconnection later. And unplug the ports annotated by the red.

4) Remove the two screws of the Constant Current Board. And unplug the motor cable.


5) Unscrew the screws of the Upper Shell.
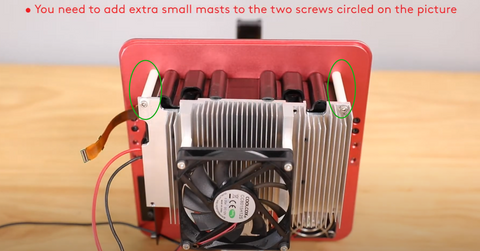
6) Remove the four screws that fix the Heat Sink, and be careful to hold the plate by hand to prevent it from falling and damaging other parts.
Caution: Do not touch the lens surface with your hands in the subsequent operations, and do not scratch the lens surface with sharp objects, If the lens surface is dusty, wipe it with a clean and dry dust-free cloth. Never use corrosive agents such as alcohol or IPA to wipe the lens.

7) Take off the hood. Remove the screws that fix the lens.

8) Take out your New Lens, tear off the film on the lens, install it then lock the screws.
9) Reinstall the hood. The side with the slot should be consistent with the direction where the light panel cable is in.

10) Reinstall the Heat Sink and lock the screws.
You need to add extra small masts to the two screws circled on the picture.
11) Move the wire of the limit switch to the front of the printer, reinstall the motherboard and lock the screws.
12) Reconnect the cables as before.
13) Reinstall the front and back shell of the printer then lock the screws.
INSTRUCTIONAL VIDEO


